Huffman 개념
https://vprog1215.tistory.com/232
[Algorithm] Huffman Coding 1: 개념
Huffman Coding 무손실 압축 알고리즘이다. Huffman Coding 예시 파일 안에는 a,b,c,d,e,f 의 단어만 있다고 가정한다. 파일의 크기는 100,000 개 이고 각 문자의 등장 횟수는 다음과 같다. Fixed-length code:..
vprog1215.tistory.com
Huffman Method With Run-Length Encoding
실제 예제를 가지고 어떻게 허프만 알고리즘이 동작 하는지 알아본다.
인코딩 대상
- 각각의 런을 구하고 해당 런에 코드워드를 부여한다.
- 즉 런에대해서 이진코드를 부여한다.
예제
- AAABAACCAABA 해당 문자열을 압축한다고 해보자
- 일단 run 을 구한다.
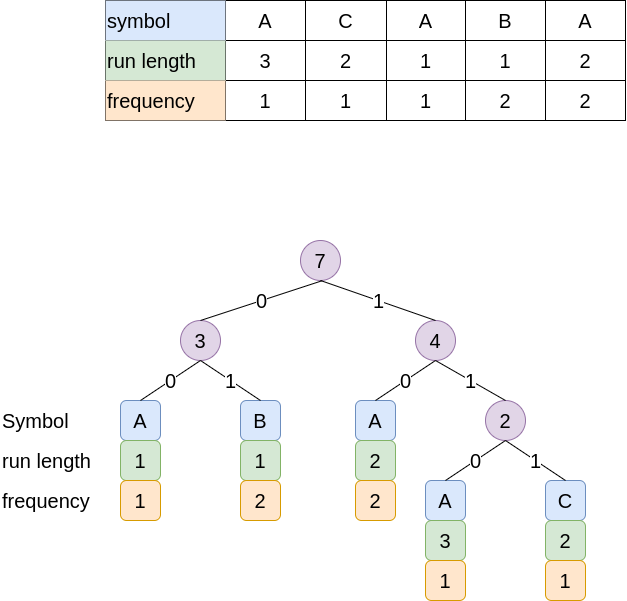
- 3A 1B 2A 2C 2A 1B 1A가 된다. - 표로 표현해보자

Huffman Tree가 만들어지는 과정
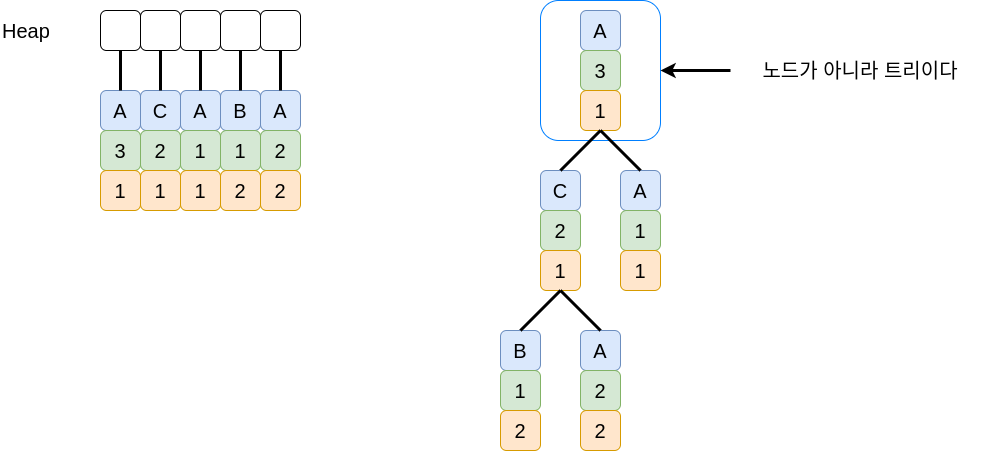
- Huffman coding 알고리즘은 트리들의 집합을 유지하면서 매 단계에서 가장 frequency가 작은 두 트리를 찾고
두 트리를 하나로 합친다. - 이런 연산에 가장 적합한 자료구조는 최소 힙(minimum heap)이다.
- 즉 힙에 저장된 각각의 원소들은 하나의 트리이다 (노드가 아니라). - frequency 기준으로 최소힙을 만들어 간다.

실제 수행과정
- Heap 에서 최소의 트리를 두개 꺼낸다.
- 두개의 트리를 하나로 합친다.
- 그렇게 되면 Heap 에는 4개의 트리가 존재하게 된다.
- 트리가 하나가 될때 까지 반복한다.

완성된 Huffman Tree
- 빈도수가 최소인 값을 2개를 자식으로 만들고
- 부모는 두개를 더한 값이 된다.

위 트리를 기준으로 정리를 해보면 아래와 같다.
- AAA: 110
- AA: 10
- A:00
- B: 01
- CC: 111
결과
AAABAACCAABA 아래와 같이 인코딩된다.
1100110111100100으로 encoding됨
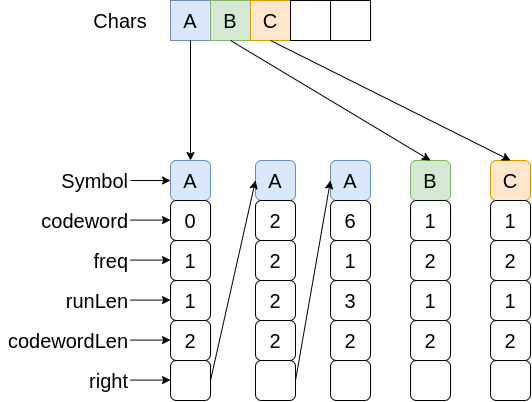
어떻게 codeword 를 편하게 찾을까?
- 우리는 파일을 한번 읽어서 run 과 huffman 트리를 만든다.
- 그 다음 또 파일을 처음부터 읽어서 codeword 를 출력해야 한다.
- 그렇다면 codeword을 찾기 위해 매번 tree 를 탐색해야 된다.
- Tree 구조로 되어 있는 것을 배열로 다시 담아 준다.

구현 해보기
- getter 와 setter 를 추가 하여 다소 내용이 길수도 있습니다.
- 이글을 보고 쉽게 이해하기 위한 목적으로 상세하게 설명 했습니다.
Run 을 만드는 알고리즘
run class
package algorithm.huffman;

import java.util.Objects;

public class Run implements Comparable<Run> {
    public byte symbol;     // symbol 을 저장한다.
    public int runLength;   // 알파벳의 길이를 저장한다.
    public int freq;        // 파일에 해당 문자가 얼마나 나오는지 저장한다.

    private Run leftChild;    // 왼쪽 노드
    private Run rightChild;   // 오른쪽 노드
    private Run rightRun;     // 나중에 트리에서 배열로 변환할때 필요

    private int codeword;     // 부여된 codeword
    private int codewordLen;  // codeword 의 길이

    public Run(Byte symbol, int runLength) {
        this.symbol = symbol;
        this.runLength = runLength;
        this.freq = 1;
    }

    public Run(Byte symbol, int runLength, int freq) {
        this.symbol = symbol;
        this.runLength = runLength;
        this.freq = freq;
    }


    public Run() {
    }


    // 동일한 symbol 인지 구별하기 위한 오버라이드
    @Override
    public boolean equals(Object o) {
        if (this == o) return true;
        if (o == null || getClass() != o.getClass()) return false;
        Run run = (Run) o;
        return symbol == run.symbol && runLength == run.runLength;
    }

    @Override
    public int hashCode() {
        return Objects.hash(symbol, runLength);
    }


    // 빈도수로 비교하기 위한 함수
    @Override
    public int compareTo(Run o) {
        if (o.getFreq() == this.getFreq()) {
            return this.getSymbol() - o.getSymbol();
        } else {
            return o.getFreq() - this.getFreq();
        }
    }

        public void setLeftChild(Run leftChild) {
        this.leftChild = leftChild;
    }
    public void setRightChild(Run rightChild) {
        this.rightChild = rightChild;
    }
    public byte getSymbol() {
        return symbol;
    }
    public void setSymbol(byte symbol) {
        this.symbol = symbol;
    }
    public int getRunLength() {
        return runLength;
    }
    public void setRunLength(int runLength) {
        this.runLength = runLength;
    }
    public int getFreq() {
        return freq;
    }
    public void setFreq(int freq) {
        this.freq = freq;
    }
    public Run getLeftChild() {
        return leftChild;
    }
    public Run getRightChild() {
        return rightChild;
    }

    public void increaseFreq() {
        this.freq = this.freq+1;
    }

    public int getCodeword() {
        return codeword;
    }

    public void setCodeword(int codeword) {
        this.codeword = codeword;
    }

    public int getCodewordLen() {
        return codewordLen;
    }

    public void setCodewordLen(int codewordLen) {
        this.codewordLen = codewordLen;
    }

    public Run getRightRun() {
        return rightRun;
    }

    public void setRightRun(Run rightRun) {
        this.rightRun = rightRun;
    }

}
실제 run을 구하는 코드
    public void collectRuns(RandomAccessFile fin) throws IOException {
        int numberCounter = 1;           // 1인 이유는 반복문 시작전 하나를 미리 읽었기 때문이다.
        byte preSymbol = fin.readByte(); // 하나의 byte를 읽어온다.

        try {
            while (true)
            {
                byte symbol = fin.readByte();
                if (preSymbol == symbol) {
                    numberCounter++;    // 앞과 현재 값이 동일하면 1 증
                } else {
                    boolean findFlag = false;
                    Run run = new Run(preSymbol, numberCounter); // 값이 다르면 런을 저장한다.
                    for (int i = 0; i < runs.size(); i++) {
                        if (runs.get(i).equals(run)) {
                            runs.get(i).increaseFreq(); // 만약 이미 런이 저장되어 있다면 빈도수를 증가 시킨다.
                            findFlag = true;
                            break;
                        }
                    }

                    if (!findFlag) {
                        runs.add(run); // 새로운 런을 list에 담는다.
                    }
                    preSymbol = symbol; // 변경된 심볼로 비교하기 위해 현재 심볼을 대입해 준다.
                    numberCounter = 1;
                }
            }
        }
        catch (EOFException ex)
        {
            System.out.println("Total number " + numberCounter);
            System.out.println("End of file reached!");
        }
    }
구한 Run을 decoding을 위해 미리 저장하는 코드
    private void outputFrequencies(RandomAccessFile fIn,
                                   RandomAccessFile fOut) throws IOException {
        fOut.writeInt(runs.size());
        fOut.writeLong(fIn.getFilePointer());

        for(int i = 0 ; i < runs.size(); i++) {
            Run r = runs.get(i);
            fOut.write(r.getSymbol());
            fOut.writeInt(r.getRunLength());
            fOut.writeInt(r.getFreq());
        }
    }
Huffman Tree 를 구하는 코드
    public void createHuffmanTree() {
        for(int i = 0; i <runs.size(); i++) {
            minHeap.insert(runs.get(i));    // 만들어진 run 을 힙에 넣는다.
        }

        while (minHeap.size() != 1) {                // 힙사이즈가 1 즉 트리가 완성되기 까지 반복
            Run childRun1 = minHeap.extractMin();    // 첫번째 run 을 꺼낸다
            if (childRun1 == null) {
                break;
            }

            Run childRun2 = minHeap.extractMin(); // 두번째 Run 을 꺼낸다.
            if (childRun2 == null) {
                break;
            }

            Run parentRun =  createRunTree(childRun1, childRun2); // 두개의 run을 합친다.
            minHeap.insert(parentRun);                            // 합쳐진 run을 힙에 담는다.
        }

         root = minHeap.extractMin();
    }

    public Run createRunTree(Run run1, Run run2) {
        int num = -1;
        num = run1.getFreq() + run2.getFreq();         // 두 노드의 빈도수를 더한다.
        Run parentRun = new Run((byte)'0', 0, num);    // parent run 을 만든다.
        if (run1.compareTo(run2) > 0) {                // 두개의 런을 parent에 삽입한다.
            parentRun.setLeftChild(run1);
            parentRun.setRightChild(run2);
        } else {
            parentRun.setLeftChild(run2);
            parentRun.setRightChild(run1);
        }
        return parentRun;
    }
codeword 를 부여하는 코드
    private void assignCodewords(Run p, int codeword, int length) {
        if(p.getLeftChild() == null && p.getLeftChild() == null) {  // leaf run 이면 구한 codeword 를 부여한다
            p.setCodeword(codeword);
            p.setCodewordLen(length);
        } else {
            assignCodewords(p.getLeftChild(), (codeword << 1 | 0), length+1);    // 왼쪽은 0을 부여
            assignCodewords(p.getRightChild(), (codeword << 1 | 1), length+1);   // 오른쪽은 1을 부여 한다.
        }
    }
Run 을 배열에 담는 코드
    private Run []chars = new Run[256];

    private void storeRunsIntoArray(Run p) {
        if (p.getLeftChild() == null && p.getRightChild() == null) { // run을 찾는다.
            insertToArray(p);                                        // 마지막 run 이면 배열에 저장한다.
        } else {
            storeRunsIntoArray(p.getLeftChild());    // 탐색한다
            storeRunsIntoArray(p.getRightChild());
        }
    }

    private void insertToArray(Run p) {
        boolean isExistRun = false;
        int index = -1;

        for(int i = 0; i < charsSize; i++) {
            if (chars[i].getSymbol() == p.getSymbol()) { // 동일한 런이 이미 저장되었는지 확인한다.
                isExistRun = true;
                index = i;
                break;
            }
        }

        if (isExistRun) {                               // 이미 런이 존재하면 해당런의 right 에 런을 추가한다.
            Run run = chars[index];
            while (true) {
                Run preRun = run;
                run = run.getRightRun();
                if(run == null) {
                    preRun.setRightRun(p);
                    break;
                }
            }
        } else {
            chars[charsSize++] = p;                  // 런이 없다면 추가한다.
        }
    }
run을 찾기 위한 코드
    public Run findRun(byte symbol, int length) {
        Run  findRun = null;
        for (int i = 0; i < charsSize; i++) {
            Run run = chars[i];
            if (run.getSymbol() == symbol) {
                findRun = run;
                break;
            }
        }

        Run tmpRun = findRun;
        while (tmpRun != null) {
            if(length == tmpRun.getRunLength()) {
                findRun = tmpRun;
                break;
            } else {
                tmpRun = tmpRun.getRightRun();
            }
        }
        return findRun;
    }
encode 코드
파일을 읽으면서 codeword를 새로운 파일에 쓴다.
    private void encode(RandomAccessFile fIn,
                                   RandomAccessFile fOut) throws IOException {

        int numberCounter = 1;
        byte preSymbol = fIn.readByte();
        String tmpString = "";

        int codeWord = 0;
        try {
            while (true)
            {
                byte symbol = fIn.readByte();
                if (preSymbol == symbol) {
                    numberCounter++;
                } else {
                    Run run = findRun(preSymbol, numberCounter);
                    System.out.println("PRESYM: "+preSymbol + "numberc: " + numberCounter);
                    writeEncodeCode(run, fOut);
                    preSymbol = symbol;
                    numberCounter = 1;
                }
            }
        }
        catch (EOFException ex)
        {
            System.out.println("end file");
        }

        if (index < 7 && index != 0) {
            for(int i = index; i < 8; i++) {
                byteArray[i] = 0;
            }
            fOut.write(byteArray);
        }
    }


    public void writeEncodeCode(Run run, RandomAccessFile fOut) throws IOException {
        int bits = 8;
        int mask = 1;
        int symbol  = run.getCodeword();
        int runLength = run.getCodewordLen();
        mask <<= bits -1;    // 000000001 -> 10000000 로 바꾼다.

        for (int i = 0; i < 8-runLength; i++) {
            symbol = symbol << 1;    // run을 byte로 쓰기전에 앞으로 run 을 땡겨온다.
                                     // 0000 1100 이면 1100 0000 으로 바꾼다.
                                     // 이유는 하나씩 차례대로 8byte에 채워넣기 위해서다.
        }

        for (int i = 0; i < runLength; i++) {
            if ((symbol & mask) != 0) {
                byteArray[index] = 1;
            } else {
                byteArray[index] = 0;
            }
            index++;
            symbol = symbol << 1;
            if (index == 8) {
                index = 0;
                fOut.write(byteArray);
            }
        }
    }
전체 코드
결과
결과를 보면 예제와 좀 다르게 트리가 만들어 졌다.
그래도 일단 잘 동작하는것 같다.
===========================================
Huffman Tree
===========================================
0,0 0
 0,0 0
  65,1 0
  66,1 1
 0,0 0
  65,2 2
  0,0 0
   67,2 6
   65,3 7


===========================================
encoding
===========================================
1 1 1 0 1 1 0 1 1 0 1 0 0 1 0 0 0 1 0 1 1 0 1 0 1 1 0 1 1 1 1 0 1 1 0 0 0 0 0 0 0 0
생각해보기
좀 어려웠다 아니 어렵다기 보다는 생각을 좀 해야 됐고
다른 알고리즘 구현하는거에 비해 시간이 많이 들었다.
아무래도 첫번째 구현한 것이므로 리팩토링이 필요하다.
너무 많은 책임을 가지고 있고 변수명, 함수명 전혀 클린하지 못하다.
그래도 허프만 코드가 어떻게 동작하는지 생각해보고 직접 구현해보니
배운게 많았다.
아 디코딩도 해야되는구나.......
전체코드:
https://github.com/rnrl1215/algorithm-study/tree/main/src/main/java/algorithm/huffman
GitHub - rnrl1215/algorithm-study
Contribute to rnrl1215/algorithm-study development by creating an account on GitHub.
github.com
'Algorithm > 알고리즘 기본' 카테고리의 다른 글
| [Algorithm] Dynamic Programming 1 (0) | 2021.10.20 |
|---|---|
| [Algorithm] Huffman Coding 3: Decoding 예제 설명 과 구현 (0) | 2021.10.15 |
| [Algorithm] Complete Binary Tree (0) | 2021.10.03 |
| [Algorithm] Huffman Coding 1: 개념 (1) | 2021.10.01 |
| [Algorithm] Shortest Path 4: Floyd-Warshall (2) | 2021.10.01 |


댓글